General Importer
The General Importer opens from the Tools menu and allows you to import data from delimited text files (such as .csv or .tsv files) into iolite. The General Importer provides flexible options for configuring how the file is parsed, including delimiter selection, header handling, time column specification, and channel naming conventions. A preview of the parsed data is displayed before import, allowing you to verify that the settings are correct.
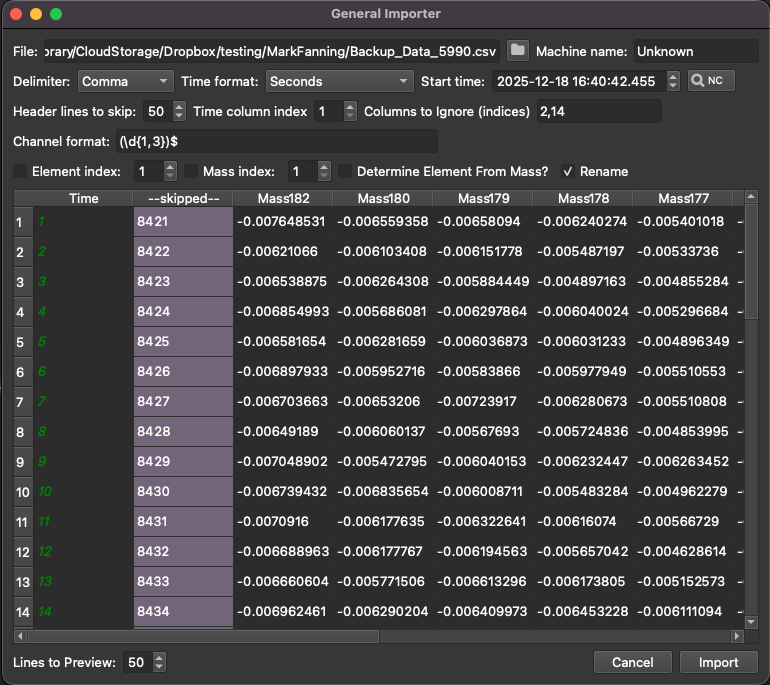
Fig. 24 The General Importer Window
The General Importer Window
The General Importer window consists of several key areas: the file and configuration settings panel at the top of the window, and a preview table at the bottom showing how the file will be parsed based on the current settings. Most settings are automatically saved when you use the importer, so they will be retained the next time you open the General Importer.
File Selection and Basic Settings
To import data, click the folder button at the top of the window to select the file you wish to import. Once a file is selected, the preview table will be populated with the first rows of data from the file, based on the current parsing settings.
The Machine Name field allows you to enter a name for the instrument or machine that generated the data. This will be stored as metadata associated with all imported channels. This field is optional and can be left blank if you do not wish to specify a machine name.
The Delimiter dropdown allows you to specify how the columns in your data file are separated. Options include comma, tab, and semi-colon. The General Importer will automatically detect the delimiter used in your file the first time you open it, but you can manually change this if needed.
The Time Format dropdown specifies how time data should be interpreted if you need to convert it. The available options are:
Seconds: Time values are in seconds
Milliseconds: Time values are in milliseconds
Full: Time values are already converted to the appropriate format
By default, time values are assumed to be in seconds.
The Start time field at the bottom of the window specifies the measurement start time for the imported data. By default, this is set to the selected file's modification date and time, but you can change it by clicking in the field and typing a different date/time. If you are working with Perkin Elmer .xl and .NC files, you can also click the NC button to attempt to automatically read the timestamp from a NetCDF (.nc) file in the same directory as your data file, if one exists with the same filename.
The Headers to Skip setting allows you to specify how many lines at the beginning of the file should be skipped before reading the column headers. Set this to 0 if your file begins with column headers on the first line, or to a higher number if there are comment lines or other metadata before the headers.
The Time Column setting specifies which column (numbered from 1) contains the time data for the measurements. This column is required and will be used to create the time axis for all imported channels.
The Columns to Ignore field allows you to specify which columns should not be imported. You can enter column numbers separated by commas (e.g., 1,3,5), or specify ranges (e.g., 1-3,7-9). This is useful if your file contains columns that you do not wish to import, such as internal identifiers or redundant data.
Channel Naming and Metadata
By default, channels are imported with the names given in the file's column headers. If the Rename checkbox is enabled, the channel names will be processed according to a regular expression pattern, allowing you to automatically extract element symbols and mass numbers from the header names.
The Channel format field contains a regular expression that defines how to extract element and mass information from the column headers. The default pattern is ([A-Z][a-z]?)(\d+), which matches an element symbol (one or two letters, with the first letter capitalized) followed by one or more digits (the mass number).
When renaming is enabled, you can specify which parts of the regular expression correspond to the element and mass using the Element Index and Mass Index fields. These numbers refer to the capture groups in the regular expression (where group 1 is the first group, etc.). For example, with the default regex:
Group 1 captures the element symbol
Group 2 captures the mass number
If your column headers have the mass number before the element symbol (e.g., 44Ca, 48Ca), you could use a regex like (\d+)([A-Z][a-z]?) with Element Index = 2 and Mass Index = 1.
Checking the Determine Element from Mass checkbox will cause the element symbol (such as Ca, Sr, etc.) to be automatically determined from the mass. For example, if the channel header is "m88", the element symbol will be determined from the mass and stored as metadata for each channel. This is necessary for trace element experiments, as iolite uses the element metadata to determine which reference material values to use for data reduction. If this option is not enabled, the element will be set to "Unknown" and you will need to manually specify the element for each channel after import. Note that this automatic element determination may be incorrect for some masses that can correspond to multiple elements (e.g., mass 204 could be either Pb or Hg), so it is recommended to check the assigned element metadata after import to ensure it is correct. You can manually change the element metadata for any channel in the Channels Browser after import if needed.
The Lines to Preview setting controls how many data rows are shown in the preview table. This allows you to check that your settings are correct before importing the entire file.
Data Preview and Import
The preview table at the bottom of the window shows how your data will be imported based on the current settings. The table shows the column headers (after any renaming) and the first several rows of data. The Time Column is highlighted in green for easy identification. Columns specified in the Columns to Ignore field are also highlighted to show they will be skipped during import.
Once you have verified that the settings are correct and the preview looks as expected, click the Import button at the bottom right to import the data. The data will be added to iolite's input data, and new channels will be created for each imported column (except the time column and any columns in the ignore list).
If the data cannot be imported due to a time overlap with existing data in iolite, an error message will be displayed. In this case, check your date/time settings and try again.
Click the Cancel button to close the General Importer without importing any data.